Thursday, July 31, 2014

Dreamweaver Stencils ...."To Die For"


This month I have had a great time working with the new dies. ....Yes, it's been an extravaganza of creativity from the wonderful "Dream it UP" team on using the stencils and dies; presenting new ideas and concepts; and of course extremely innovative creations. I have loved every minute of seeing what they have been blogging about this month. Also we have had a good following in spite of all the summer vacations happening.

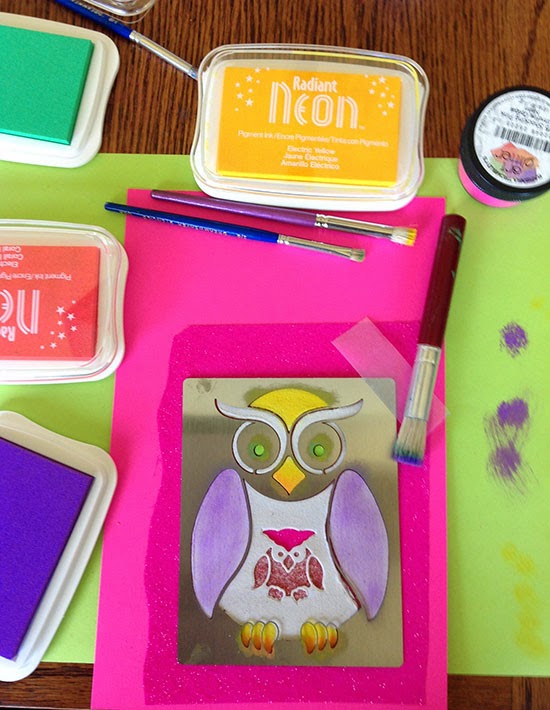
A couple of weeks ago I worked with the owl die (DG751) every day for a week, so if you missed out please look back to learn more. Click HERE to see how I made a very similar card to this one.The creation that you see here was a by-product of that week of craziness. This week's blog is really not about this die but rather the one inside the card shown below. However, I did one thing differently on this card than the one I created a couple of weeks ago. The main difference with this owl is that the papers that I used were so busy that I decided to take an 01 micron pen (30181) and trace the outlines of the design, to make it "pop" a bit. Here is a picture of the inside:
I told you last week that I would share more about our dual alphabet die. Last Thursday, I took a picture of the caddie and since then have discussed with my team here at Dreamweaver how they would use this system. Of course there are as many ways to use this as there are crafters, but here are a few suggestions and pictures to give some ideas...by the way leave me a comment as to how you might use this caddie. I am really a newbie at die-cutting and very excited about learning more.


The caddie consists of a box with a base and lid measuring about  4 1/2" x 9" inches. (The base is marginally smaller.)  The base holds 13 smaller boxes that are each approximately the size of a deck of playing cards. 


The caddie will have a magnetic sheet for the dies with an adhesive backing. All you need to do is remove the release paper to reveal the sticky backing and you are ready to place it where you want to on top of or inside the caddie.


In the first photo the magnetic sheet is placed on top of the caddie. For my needs I would like to place the magnetic sheet inside the lid. Notice that after the letter "O" four of the letters need to go sideways to fit all of them on the magnetic sheet.


Some of my help feel that they would rather keep the letters inside the smaller interior boxes along with the stored paper piecing die-cuts. If you want to use the 13 boxes only for the alphabet you would place three pieces in each one and it would come out evenly. There is also a question mark and an exclamation mark and an ampersand which I add to the last two alphabet pieces...eg. Y, Z, &, !, ?".


Rather than having labels I used a permanent marker to indicate which die-cuts and dies are in each box. I prefer this to using labels, but some of the team here said they would rather have a label. Also I decided that I'd rather store more alphabet pieces than three per box and use one box for all the numbers. 


This frees up the magnetic sheet to be used for other dies and then the extra boxes I can use for the die-cuts of the designs that work really well for paper piecing, as shown in the picture.

I never thought I would enjoy die-cutting as much as I do, because I love working with a stencil brush and paints. But choosing colors of paper and designing in conjunction with the matching stencils as well has been soooo much fun. Can't wait to start playing with the new designs that just arrived.  It will be a couple of weeks until our magnetic sheets arrive, so mid- August is our hope for release of this new dual alphabet system. Until then be sure to join our monthly challenge, next Thursday we will announce our two random winners of the "to die for" challenge. For the month of August Pam has given us the challenge of "August as an Adjective"...so start thinking of what awe inspiring and sophisticated creations you'll share with us. 

Visit my wonderful team listed below...almost everyone is playing along and our guest designer Terri Sproul as well. Each week her latest creation is my "favorite" piece yet. Give each of them some love in the way of a comment or two or three, it's what they live for, that's the irony this month...Is it "to die for" or "to live for"?


Dream It Up! (you're here)
and

Thursday, July 24, 2014

Dreamweaver Stencils are to Die for/ Plus...we have Winners!


Scroll down to the bottom to find out who the two comment winners are for this past week's challenge. Thanks to all who joined my own private challenge as I went crazy with the owl die set this past week. 

We are continuing our month of Dreamweaver Stencils to die for. I have to admit my card this week did not use stencils, but I am sharing a bit more with you regarding our new dual alphabet die set which will be available mid August.

I die-cut the large and small pears (DL563) into the front of my card. Then I ran the dual alphabet through the die cutting machine (Big Shot). Here is the sentiment inside the card...great for an anniversary or just a card of friendship:


The new dual alphabet can be used two ways. And a great advantage is that the pieces that come out of the dies are not bits and pieces ( I guess the technical term for that is "counters"). Each one of the alphabet pieces comes out in ONE piece...no little pieces to keep track of. Remember a couple of days ago I told you that I had something else to share? Well, here's a picture of the caddy that they will be sold in. It has 13 smaller boxes (each about the size of a deck of cards) inside the large box and you can place your die cut alphabet pieces in these to organize and save your extra cuts for later projects...you could even put three dies in each box with the cuts:


As I said earlier, our new alphabet and caddy will be ready mid-August. Be sure to come back next Thursday and I will show you another aspect of this dual alphabet system that I think you are going to like.

Now don't forget to join our "to die for " challenge this month and sign up with inlinkz below. Remember, it doesn't have to be a Dreamweaver Stencils die and stencil, however I do love seeing what you create with our stencils. It doesn't even have to have a die in it, we're easy. Just come along and play with us...here is the team and our guest designer, Terri Sproul. Leave them some nice comments, it's one of the reasons they work so hard on the Dream it UP team.


OUR WINNERS

Occasionally I like to tell people how we choose our random winnners. We try to change it up, so that it really is random. Sometimes I use the random number generator, but this time what I used it to choose two people from each of the seven days. (Only one of your comments qualified for each of the days and my team members aren't counted if they leave comments.) After I chose two comments from each day using the generator I wrote those names on pieces of paper (14 comments and some of you were in there more than once) and placed them in the blue bowl (my lucky blue bowl) then had the WayneMeister (see he's good for other things besides Zentangle work) pull out two names. They are as follows:

BURNING RUBBER from Sunday's comments
SABRINA from Saturday's comments

Please send me an email with your snail mail address and we will send you both the Nested Owl Die Set. lynell@dreamweaverstencils.com

Wednesday, July 23, 2014

Graduation Owl:Learning from Experience

The last few days have been so much fun for me because you have been sharing your ideas with lil ol' me. Wow! Thank you! Today's creation was inspired when Sandi Lou suggested a graduation card. By the way Sandi Lou,...your other idea of making felt finger puppets with the cut out pieces added to the puppet is genius! All of you have given such great ideas and of course I don't have enough hours in my day to try them all. Be sure to join our die-cut challenge this month and show us how you would create some of these things while using your own style. If you don't have a blog and would like to join the challenge you are welcome to send me a picture and I will post it during the week. lynell@dreamweaverstencils.com

Don't forget to leave a comment today for a chance to be one of two random winners of the new owl die set. Winners to be announced on Thursday's Dream Schemes...the time when my designers and our Guest designer, Terri Sproul get together to show you what they've got. Remember I have something else to show you on Thursday regarding our new Dual Alphabet die set.


Today's Tutorial:


The basics for doing this owl is exactly like the Sunshine Owl from a couple of days ago.However instead of using the paste just white I mixed my own color of paste with the Wendy Vecchi Archival re-inkers as shown yesterday with the Baby "nest" card. I used her Dandelion colored ink. I often do my mixing on a piece of wax paper or freezer paper and then I can fold it over onto the mixed paste and use it as I need it...this will keep it from drying out.


I die cut the shape of the largest owl out of a sticky mounting paper.

Save the cut frame piece to use later.

Then I remove one side of the release paper and add glitter to the owl.


Add the glitter to the sticky paper by rubbing it into the owl. I used Art Glitter's microfine #515 called Riverbank.


The next few steps are exactly like the sunshine owl from a couple of days ago...once the embossing paste is dry you are ready to add your color, so don't be surprised at looking at the bright punk pink color:


Use the LG751 Large Owl Stencil and paste emboss with the now colored Dreamweaver Embossing Paste (DEP). But in order to place the stencil it can be difficult to align, so I taped the frame from the original cut out onto the stencil...you need to act like this is just part of the stencil I refer to this as a stencil/frame piece. Then place the glittered owl shape face down into this cut out stencil/frame for perfect alignment. BUT don't tape the glittered owl into this frame or it will be difficult to remove when you are finished paste-embossing.
Before you do anything else...take a couple of pieces of removable tape and roll them...then adhere them to the back of the owl. This will ensure that the owl is anchored on the paper when you remove the stencil/frame after the paste-embossing process. Now turn the owl over onto a piece of scrap paper and tape down on all four sides. Apply the Dreamweaver Embossing Paste to the Paste Spreader using the smaller palette knife (DPK).
Paste-emboss with the spreader (LM2010) with just one sweep of the spreader if possible and then remove the stencil/frame with the hinge technique. This is where that rolled tape on the backing of the owl helps...because when you lift the stencil the owl will then stay on the paper and the frame and stencil will be lifted away.


I let the embossing paste dry and then I repostioned the large owl stencil (LG751) and stenciled it with the Tim Holtz distress inks using stencil brushes. I didn't put the color on really heavily, because I was going to hand it over to Wayne to add some Zentangle patterns and I wanted his magic black pen to show up on the stenciled surface. The pattern on the upper part of his wing is called "purk" and then the lower pattern is one of his own creations called "drain-oh". This is the second piece that Wayne has done on the regular Dreamweaver Embossing Paste (DEP). This paste is porous and accepts stenciling paints and inks beautifully, but we weren't sure how it would be for drawing with the micron pens. His comment ...(because it is porous) was... "the pen tip can drag or catch sometimes", so you need to be aware as you work that this could happen, keep your pen tip angled and moving.

The finishing touch to the card was the mortarboard and diploma: the graduation stencil (LL449). It was paste-embossed using the Dreamweaver Matte Black Embossing Paste (DMBP).


Let it dry well, then cut out the two pieces with a craft knife. I cut the mortarboard a little shorter because it was sitting kind of high on his head.

Here's a close up:


Happy Birthday Leah!

If you are here to join the new owl die-cut commentary challenge scroll down to the next post! This card was created for Leah's birthday! Artwork by Wayne Harlow and notes on Dreamweaver Embossing Paste by yours truly!

Well, Leah, you've made it into the double digits! Congratulations and hope your day is a great one.


The happy birthday and the sing your song stencils (LM248 and LG734) were paste-embossed with the Dreamweaver Embossing Paste. This embossing paste is having it's fourteenth birthday this year...older than you, Leah. However not by much.

These paste-embossed words need to dry at least half an hour before you stencil them. If you place the card in a warm place (I often set it on an old electric skillet on a warm setting) it will dry in less than 10-15 minutes.


I then stenciled it with a soft tipped stencil brush and a rosy red pigment ink. My first coat was all over very lightly to accent the soft rose in the breast of the birdie. When I stencil I always tape out all of the edges...you don't want to swish color onto your pretty cardstock.


Next I stenciled another layer of color onto the embossing paste, but this time at the bottom of the words to create contrast and intensity. One nice thing about this embossing paste is that it stencils beautifully with almost every type of ink or paint. You just need to know a few tips about stenciling and you are on your way to crafting successfully. The only exception is maybe waterbased inks, but even those do fairly well on this wonderful medium...see the next post where I use Tim Holtz water-based Distress inks on the paste, beautiful if I do say so myself. 

What are some of the other advantages to our embossing paste? It's flexible and won't crack off of the paper, is not smelly, the jar has a shelf life of at least five years, and you can even tangle on top of it, as shown by Wayne in the next post. If you are very excited about the product you can even purchase our larger 8 ounce jar for $15. Great price and twice the fun....at least twice the paste for less money.


Here's Wayne giving a slight shadow to the words with an 01 Micron pen by Sakura. He is drawing right under each letter to make them pop!

Have a HAPPY 10th!


Tuesday, July 22, 2014

Nesting Owl Dies/Paper Piecing on Embossing Paste Second Verse Similar to the First

Today I  am still using the owl dies for my challenge here on the Dreamweaver Stencils home blog. Remember to leave a comment for a chance of being one of two random winners to win the nested owl die (DG751). You can comment once a day until this Thursday when our wonderful design team and guest designer, Terri Sproul will be back on board to show you what they are creating for the Dreamweaver Stencils to die for challenge this month.

I am also teasing you today by showing you one feature of our new dual alphabet die which won't be ready until sometime next month. But I have been having a lot of fun playing with it and this Thursday I will be showing you more. Here is my tutorial on how I created this uber-simple card. If you have been following this week you will realize that this technique was done a couple of days ago...just a different creation. Same bird song...second verse.

Today's Tutorial-Paper Piecing with Stencils and Die-cuts:


These are a few of the materials that I begin with...we are going to mix our own color of paste using re-inkers to add color. Usually I recommend tube acrylics because they are considered heavy body or thick paint and won't add too much moisture to the paste. But today I am using the Wendy Vecchi Archival re-inkers, which just a few drops are added to the paste and won't cause it to be too soupy to use.


I mixed a few drops of Wendy Vecchi's Archival reinker color called Dandelion into the regular Dreamweaver Embossing Paste (DEP). It was perfect for my nest and the color behind the owl. Mix it well...or, if you prefer, you could leave streaks of the Dandelion color for a more distressed look.


Paste-emboss the owl stencil (LL3039) and the nest stencil (LL3041) and set them aside to dry. I keep the excess paste that was mixed in a special jar that seals well so that your mixed paste will last a year or two. Containers that you purchase for food leftovers will only last a couple of months before the paste dries out. Glass containers work well, but the right size is hard to find and if your glass jar is too big you may have the same drying problem.
If you are interested in our containers you can purchase from Wendy Vecchi's distributors or from www.stencilwithstyle.com This is a new item and will be available at a retailer near you very soon.


While the paste-embossed images are drying I worked on the die-cut pieces. I started by removing one side of the release paper from the double sticky paper. Then I attached the sticky side to the back of two or three different decorative papers.

There are many sticky papers on the market. The Dreamweaver double sticky paper (MPDS) has a release paper which cuts when you put it through the machine.


I die cut them out using the paper pieced medium sized owl from the nested Owl die set (DG751). I placed them on a piece of cardstock and tried different combinations until I found the formula I wanted. By now your paste-embossed owl and nest should be dry, so remove the other side of the release paper from the owl pieces you have chosen and stick them on top of the paste-embossed owl design. This is really one of my favorite looks...again we refer to it as paper piecing with dies and stencils.


Our new dual alphabet will be available in August and you can use the framed letter which we used in our NEST card or the letter that is cut out of the framed letter. We made the letters so that each one that punches out of the framed letter is entire. In other words it will come out in one piece and you won't have any letters that come out in two or three pieces. Also I will be showing you another feature of our alphabet on Thursday, so be sure to stop back.


Monday, July 21, 2014

You Are My Sunshine (TUTORIAL...at last)


This is owl card #2, she is done with Punk Pink Art Glitter and glued onto a sticky paper that was glittered with Lemon Zest Art Glitter. Some of the pictures in the tutorial are done with a different glitter colorway but the techniques are the same. 
My internet was down most of Sunday and is super slow this evening. My provider said, "there are outages and they are working on them". This card was very involved and really needed a picture tutorial so I am a little late getting it up and running but here it is...FINALLY! I actually worked on this on and off for a couple of hours and my card #1 had a few flaws, so this is actually owl #2 card. When I finally finished her (and baby) I showed it to Wayne and his comment was..."that sure is bright"! And I said, "Good, because I am titling this...YOU ARE MY SUNSHINE". By the way, I know that owls lay eggs and aren't actually pregnant like I'm portraying this owl...but I am making this for a friend who is...so I'm just sayin' I do know my ornithology and physiology. lol! Also I wanted to thank Louise Healy, who happened to say something during a recent chat that gave the idea for this card...I honestly can't remember what she said but I know it was influential. Anyway, if your are reading this Louise...thanks!

Leaving me a comment each day this week will increase your chances to win the new owl die set ...which you can view on yesterday's post. There will be two winners. I want to thank those of you who are leaving me comments with inspiration and ideas and leaving such interesting comments ...of course I love that some of you are stopping by just to say hi!  Christina Doré gave me the suggestion of using the owls with some baby prints and I love that idea. Am hoping to work on that this week. Also a suggestion of graduation was great and Halloween is a really good idea too. Thanks all! Don't forget that our challenge this month is Dreamweaver to die for and you don't have to use our dies...any die will do! We love to see your cards even if they don't follow the challenge that closely, we like to have you involved and each month we are picking two random winners and they get to choose any stencil they want.

I haven't had time do links yet, but will get that done after I walk and have breakfast...first things first ;)

Materials:

Dreamweaver Embossing Paste (original/regular)
DG751-Nested Owl set (the large owl shape and the tiny owl)
MPDS-Mounting Paper that is sticky on both sides


I used "Imagine Crafts" Neon ink pads which we used a couple of weeks ago when we did a blog hop with their team. So that is the pigment ink that I used on the regular Dreamweaver Embossing Paste for color. I used Art Glitter's "Lemon Drop" transparent glitter and "Punk Pink" opaque glitter on the sticky paper for the die cut owl.

TUTORIAL:
Cut the owl die shape out of the mounting paper that is sticky on both sides and save the frame piece to use later.


Remove the release or backing paper from one side only and cover with the opaque red or Punk Pink Opaque Ultrafine Gitter from Art Glitter. Rub the glitter onto the sticky paper.
Use the LG751 Large Owl Stencil and paste emboss with the regular Dreamweaver Embossing Paste (DEP). But to place the stencil is difficult to align, so I taped the frame from the original cut out onto the stencil...you need to act like this is just part of the stencil. Then place the glittered owl shape face down into this cut out/stencil for perfect alignment. BUT don't tape it or it will be difficult to remove when you are finished paste-embossing.
Before you do anything else...take a couple of pieces of removable tape and roll them...then adhere them to the back of the owl. This will ensure that the owl is anchored on the paper when you remove the stencil/frame after the paste-embossing process. Now turn the owl over onto a piece of scrap paper and tape down on all four sides. Apply the Dreamweaver Embossing Paste to the Paste Spreader using the smaller palette knife (DPK).
Paste-emboss with the spreader with just one sweep of the spreader if possible and then remove the stencil/frame with the hinge technique. This is where that rolled tape on the backing of the owl helps...because when you lift the stencil the owl will then stay on the paper and the frame and stencil will be lifted away.

Remove the frame from the stencil and let the paste-embossed owl dry for at least a half an hour. This is where and old warming pan or electirc skillet or griddle comes in handy. I put it on the lowest heat setting and let it get very dry. You are going to put this pasted piece through the die cutting machine, so you don't want the paste to be damp or she might stick to the acrylic plates during the next step.
Place the smallest owl die in the middle of the VERY dry paste-embossed image. When I run this through my embossing machine I add an extra shim because I really want this to cut through the extra thickness of the embossing paste PLUS the glittered sticky paper and through the release paper on the back of the glittered owl.
This reverts back to my owl #1 card where I had used red glitter and glued the owl onto a piece of hot pink glittered paper, but the process is the same....NOW you adjust the stencil onto the paste-embossed image and stencil with a variety of small stencil brushes using the NEON pigment inks from Tsukineko/Imagine Crafts. On my #2 owl that is shown at the top I placed the hot pink glittered owl onto a Lemon Zest glittered background.

The wings were stenciled a light color of purple. Then while the owl stencil is still in place I used the LG629 scales background stencil on top and stenciled the wings with more purple ink to create a feathered look.

The tag "you are my sunshine" was an outline font that I printed off the computer with the help of the Wayne (...the fontmeister) and I colored it in with Sakura florescent pens.

This card was extra fun...sending to a pregnant friend who has been on her back in bed for many days. I haven't been there, but I can imagine...

Sunday, July 20, 2014

Using Your Dies with Embossing Paste


This week I am so excited to be showing you different things you can do with the new nested owl dies (DG751). There are three different dies in the set. The largest one matches our largest owl stencil (LG751) and is actually only a shape. The second or middle sized die we refer to as the "owl buddy" die and it matches our "owl buddy" stencil (LL3039). Friday and Saturday I worked with the "tiny owl" die, which as you may have figured out, is the tiniest of the three. Nope, it doesn't match any stencils, but we had room to fit another owl inside for added value, so we couldn't resist. On Friday and Saturday I worked with this tiny one and had a great time.

If you leave a comment you could be one of the two random winners of this new nested owl die set (DG751). (Not the stencils though...I just put those in the picture so you would know how they match for paste-embossing or stenciling.) Also I am throwing in some of the double sided sticky paper scrap that I have a plethora of. When you are leaving me a comment, give me an idea of what you might do with the dies...that would be a bonus for me!


Today I am working with the middle sized die, "owl buddy".  I started by putting a piece of double sided sticky paper (MPDS) onto the back of the paper I wanted to die cut and ran it through the Big Shot embossing/die-cutting machine. This means that each piece has a sticker backing added and makes it much easier to attach to the paste-embossed surface you see in the next step. 


The "owl buddy" stencil (LL3039) and the bird words stencil (LG734) were paste-embossed with the Matte Black Embossing Paste (DMBP). I did the tiny nest above his head and the word "nest" first that way when I paste-embossed the "owl buddy" stencil there was room between these other two images and the owl stencil was not lifted. The "bird words" stencil is large with a lot of other bird words and thoughts on it and if I had done the owl first the larger stencil would be raised up and it might be harder to paste. Let these images dry really well. I use an old electric griddle on the lowest setting and place my paste-embossed pieces onto this warm surface. That way the paste will dry in record time...just ten minutes or so.


When your owl design is dry, reposition the nest stencil from bird words onto your paste-embossed image. The Metallic F/X come in a beautiful array of colors. Prepare them by opening the lids in front of each jar. I used Glacier, Cocoa and Kiwi for this nest design. Begin by daubing glue from the Stamp and Stick Gluepad (GSP) with a jumbo dauber (KD02). Then put the tip of the stencil brush (GHB) into the pot of Glacier colored Metallic F/X and tap it into the lid so you will have just a tiny bit on the tips of the bristles and then tap it onto the center of the eggs. Leave just a bit of the Matte Black Embossing Paste showing at the edges for contrast. Rub the brush out on a dry or damp paper towel and repeat the process for the twigs using Cocoa and finally use Kiwi on the leaves at the outer edges of the design.
For a finishing touch I added the May Arts Houndstooth Ribbon behind the owl.


Now remove the die-cut pieces from the release paper and place on top of the design wherever you want. I added the thought bubble and left the pupils of the eyes, eyebrows and chest showing just the Matte Black Embossing Paste (DMBP). Putting the die-cut pieces on top of the Matte Black paste really gives it that extra handcrafted embossed touch.

Blog Archive