Thursday, September 25, 2014

Christmas and the Holidays Challenge/This week...."the holidays"

The center leaf is first paste-embossed using the metallic gold embossing paste...read on to know more.
This month we are showcasing some of our new holiday stencils and dies. Some of you were wondering what our theme is and we are excited to have you play along. The challenge is open to interpretation for a Holiday extravaganza. Our new designs include Christmas and Fall holidays. Just want to let you in on a bit of our blog history and how we work our challenges....when we first started our blog we encouraged people to design with our stencils. But we discovered that a lot of people who did cardmaking and crafting didn't have stencils...so we changed up our requirements for the challenges to general cardmaking including using stamps. However things are achangin' and many people are stencil savvy. So next month we will be doing something to include both stencils and stamps.... also every once in awhile I have something different on my blog to see if you are paying attention and I have a random drawing for those who are leaving comments. Today I have something for the Zentangle artists out there. For those of you that are regulars you know that Wayne and I are a team when it comes to his Zentangle work on my blog. I create and render the card creation and Wayne does the sten-tangleation. This week if you are a zentangle enthusiast leave a comment and tell me what zentangle pattern you might like to use on these leaves. A single commenter will be randomly chosen for one of the new stencils of the leaf designs. Now here's how we did today's card...

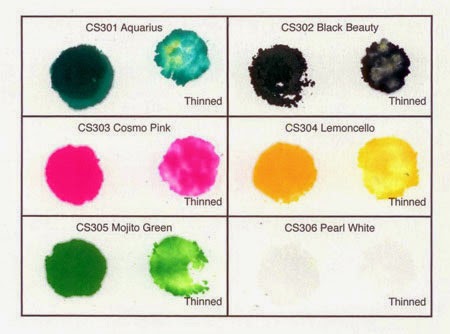
I used the Color Solution Alcohol Inks to do the background first. It was done on digital cardstock that has a glossy type of finish. You can either squirt several alcohol ink colors and the thinner/cleaner onto your craft mat and then lay the paper on top and move it around or you can squirt the Color Solution Ink and thinner/cleaner on top of the paper and place a second piece onto that and smear the colors together. Both methods give some great results. Here is a sampling of the actual colors we have:

Next I traced the new oak leaf stencil (LL3043) onto the dried Color Solution inked card using an 01 size micron pen by Sakura, leaving a gap between those two outlined leaves. I then paste-embossed the maple leaf stencil (LL3044) using Dreamweaver Gold Embossing Paste (DGP) in the center of these outlined outer oak leaves and once this maple leaf was dry (about 30 minutes....I set mine on a warming pan to hasten the drying time to about 15 minutes), Wayne worked his magic by creating the tangleation with three different tangle patterns on the three leaves. The center tangle on the paste embossed gold leaf is a pattern called "betweed", the one on the left oak leaf is a pattern called "fassett" and the third main pattern on the right leaf is called "yincut". You can go to Linda Farmer's site, www.tanglepatterns.com to learn the step-by-step process of those three patterns. Wayne is amazing...he is an organized type of person and often chooses grid based patterns to work with. I love what he does and although I love the grid based patterns I am also very attracted to the organic patterns that he works with occasionally too. There is definitely something for everyone when it comes to this innovative art form. Wayne became a certified Zentangle instructor (CZT) and has encouraged me to do so as well. I am not quite there yet, but I do occasionally sit down and work with him, tangling away sometimes. In October we will be at the store Art 'n Soul in Lacey, Washington. The owners of that store do wonderful things with Zentangle and Wayne and I have been asked to demonstrate and teach for an annual Christmas event. Perhaps we will see some of you there.


Next Thursday on the blog: Happy Hallowthanksmas! 

And the team will also be doing 31 days of Halloween. 

We will announce this month's challenge winners on the first Thursday in October.

We choose two random winners from your challenge postings each month....one from the USA and one from another country (I've noticed we have a lot of UK challenge posts and many are using stencils, WOW! ....Great works of art!) Here is a picture from two UK winners that have won for their comments on the Woodware blog hop last month. Meet Diane and Julie! Thanks Diane for sending a picture. Looks like Julie is already creating for the next challenge. YAYA!


Now don't forget to visit the Dream it UP team this week to see what beauties they have created. We have been blessed this month to have guest designer Wendy Price joinng us. It is the highlight of my Thursdays seeing their creations. Please leave some comments for them because I think that is also one of the reasons they do this work for so little. We love to have the feedback.


Thursday, September 18, 2014

Christmas and the Holidays/Challenge for September

Where did the summer go? Kids are back in school, with all the insanity that goes with it, vacations are a not-so-distant memory, and it is once again time to get busy with the important things in life...crafting for the holidays! Yay! All of September the Dream Team will be featuring all the new goodies we have for the "Most wonderful time of the year", the fall and winter holiday season. New stencil designs, new dies, and...brand new, soon-to-be-released embossing folders featuring some of our top-selling designs, all to be found on-line through the Stencil with Style web-site, or your local papercrafting store.

Here's my holiday inspiration for this week:


Well as you can see I am using more of the background papers that I did last month using our Color Solution Alcohol Inks.  However today I am showing you one of the new stencils... the tall poinsettia stencil (LL3046).

The technique is Molten Magic, I love this technique because you can use any of the glossy embossing pastes and because it requires heating it with a heat gun it is dry almost immediately and ready to put into the mail. So this is another Christmas card creation that can be done very quickly. The only time consuming part is tying that crazy bow...never have been able to render a bow like I want it...LOL!

Here is Molten Magic step-by-step:

1. Paste-emboss the poinsettia (LL3046) with the Metallic Gold Embossing Paste.(DGP).

2. While the paste is still wet sprinkle the centers with "Goldfinch" Metallic F/X. Sprinkle the leaves with Forest and Kiwi Metallic F/X and the flower with Purple Satin and Kimono Red Metallic F/X.

3. Tap off the excess powder into a waste basket.

4. Heat with a hot heat gun. The light weight heat guns won't work you will need a higher powered heat gun. Only heat until it starts to bubble and move the gun immediately to an area that hasn't bubbled yet. Keep the gun moving so that it doesn't burn your paper.

5. Repeat the process on the BELIEVE stencil (LM224) using the same gold paste and then sprinkle it with Goldfinch Metallic F/X and heat it until it bubbles. Finer lined stencils like the believe stencil are going to heat up more quickly, be careful that you don't overheat it.

Please take the time to visit the dream team listed below and leave some love in the way of a comment or two. I have the best design team in the whole world. (No brag just fact). And then make a wonderful card and link your creation below.


Thursday, September 11, 2014

Christmas and the Holidays Challenge/Week#2

Where did the summer go? Kids are back in school, with all the insanity that goes with it, vacations are a not-so-distant memory, and it is once again time to get busy with the important things in life...crafting for the holidays! Yay! All of September the Dream Team will be featuring all the new goodies we have for the "Most wonderful time of the year", the fall and winter holiday season. New stencil designs, new dies, and...brand new, soon-to-be-released embossing folders featuring some of our top-selling designs, all to be found on-line through the Stencil with Style web-site, or your local papercrafting store.

Here's my holiday inspiration for this week:


Because I am traveling this month, Rebekka B helped me with another design collaboration. Thanks Rebekka! She is making multiples of this one so the retail stores which carry our stencils and dies can have them to show customers....YOU. We did one of my favorite techniques on this one....Double Glitter. Plus, this time around we also used two of our new designs. We have had the stocking design as a stencil for a long time, but now we have it the same stocking as a die (DG692). This stocking comes nested with two other stockings and the largest is the one you see here and is a good size for a card. After doing the double glitter technique with the large dot stencil twice...the first time with red dots and a green background and the second time with green dots and a red background....the glittery decorative paper was die cut with the new stocking die on both papers. Use one paper for the top of the stocking and the other color for the bottom of the stocking.

The other new design is a chevron background stencil (LX7026) and it was paste-embossed onto black cardstock using the Glossy White Embossing Paste (DGWP) then it was set aside to dry. My tip for faster drying time of your paste-embossed pieces is to set the wet items onto a warming pan for food, or an old electric skillet or electric pancake griddle using the lowest heat setting on the appliance.

A final embellishment is the BELIEVE stencil (LM224) paste-embossed onto a black cardstock cut into a ribbon shape and while the paste is still wet it was sprinkled with opaque glitter. One advantage to using opaque glitter is  that you can use any color of embossing paste under the glitter. I happened to have Metallic Gold Embossing Paste (DGP) on hand so that paste was used. A simple 3/8" satin black ribbon added the final touch....elegant yet fun at the same time. 

Click HERE to see a video I did for a television show called Scrapbook Soup showing how to do the double glitter technique.

Now take time to visit the rest of the team, as well as our guest designer for this month, and see what wonderful holiday cards they've created this week. Don't forget to link your challenge creations for a chance to be one of two random winners for September.


Thursday, September 4, 2014

Christmas and the Holidays/New Designs...New Challenge/+Winners


My creation for the first week of our September challenge uses one of our classic designs, the poinsettia (LG700) together with our new dual alphabet dies (DD005). I have been having so much fun with the alphabet and the caddie that holds it, that I couldn't resist sharing it with you. Scroll down to the bottom of the post to discover the winners for August as an Adjective. 

This card couldn't be more simple to do for the upcoming holidays. I cut black linen cardstock and stenciled the poinsettia with Versacraft White ink (by imagine crafts). You can either stipple or rouge the white colored ink using a large stencil brush (NHB 3/4"). It will give you very different results, but both beautiful. Then I squirted a daub of Brilliance from a bottle of re-inker (coral) onto my craft mat. Use the same large stencil brush and load the pink or coral color into it, you may need to rub it into a paper towel a few times to work the color around so that it is all over the tips of the bristles. Also off-load the wet ink just a bit into a dry paper towel. Next stipple this pinkish color onto the now white poinsettia. Doing this will give a speckled looking effect to the design....very similar to some of the recent hybridizations of the red and white poinsettias I have been seeing the past couple of years during the holidays.

Cut out the letters  "J-O-Y" with the dual alpha dies (DD005) and remove the inner alphas out of the rectangular alphabet shape of each letter, set them aside to use on some of your cards. Angle them randomly on the right side of the card. I like to put double sticky paper onto my cardstock before I run the dies through the machine, this way the letters automatically have sticky backing on them. Glue crystals or sequins or brads into the center of the flower. My favorite glue for crystals is Gem-Tac by Beacon Adhesives.

I was so amazed at how quickly this card went together and as it gets closer to the holidays that is something that is essential for making the greeting cards fun to do.

Click HERE to see my post in July...all about different ways to use your dual alphabet and caddie.


The two random winners for our "August as an Adjective" challenge are:

KAREN BALLENTINE
and
GLORIA SHIRR

So send me an email with your favorite stencil request and we will get that to you ASAP! lynell@dreamweaverstencils.com


Now be sure to visit the team that is posting this week ...listed belowl, along with our special Guest Designer for the month of September, Wendy Price. They work hard for Dreamweaver Stencils and we would love to have you leave them some love in the way of a comment or two.